As I set foot in the kitchen, a wave of nostalgia hits me—the kind that wraps around you like a warm hug, reminding you of sweet family gatherings and laughter. Today, I’m excited to share my cherished Italian Chocolate Tart (Crostata al Cioccolato) recipe, a perfect fusion of rich chocolate and buttery crust that brings back those comforting moments. This indulgent dessert isn’t just a crowd-pleaser; it's also a breeze to prepare and can be made ahead, giving you more time to celebrate with your loved ones. Whether you’re treating yourself after a long day or impressing friends at your next dinner party, this tart promises to deliver satisfaction and joy with every slice. Ready to whip up a masterpiece that will leave everyone craving more? Let’s dive in!
Why is this Italian Chocolate Tart irresistible?
Decadent, Rich Flavor: Each bite of this tart offers a heavenly blend of dark chocolate and a buttery cocoa crust that melts in your mouth.
Easy to Prepare: With just a few simple steps, you can create an impressive dessert without being a master chef.
Make-Ahead Magic: Prepare it in advance—this tart tastes even better after chilling, making it a smart choice for busy schedules.
Crowd-Pleasing Delight: Perfect for gatherings, holidays, or a cozy night in, it’s guaranteed to impress guests and family alike.
Versatile Pairing: Serve it with whipped cream, fresh berries, or nuts for added texture and flavor—a delightful twist that caters to everyone’s preferences!
Italian Chocolate Tart Ingredients
For the Crust
- Flour – 200 g for a sturdy base that holds the rich filling perfectly.
- Granulated Sugar – 100 g to balance out the cocoa’s bitterness.
- Cocoa Powder – 40 g enhances the chocolate flavor of your tart.
- Salt – ¼ teaspoon boosts the overall taste profile.
- Cold Butter – 120 g creates a flaky texture when cut into the dry ingredients.
- Egg – 1 large egg binds the crust together.
- Egg Yolk – 1 adds richness and color to the dough.
For the Filling
- Milk – 400 ml serves as the creamy base for the chocolate custard.
- Egg Yolks – 4 provide smoothness and depth of flavor to your filling.
- Granulated Sugar – 80 g sweetens the custard elegantly.
- Flour – 40 g acts as a thickening agent for the filling.
- Dark Chocolate – 200 g for an indulgent, luscious flavor that defines the Italian Chocolate Tart.
With these delightful ingredients, you are well on your way to creating a dessert that will not only tantalize your taste buds but also leave your guests in awe!
Step‑by‑Step Instructions for Italian Chocolate Tart
Step 1: Mix the Dry Ingredients
In a mixing bowl, combine 200 g flour, 100 g granulated sugar, 40 g cocoa powder, and ¼ teaspoon salt. Use a whisk to blend them thoroughly until evenly distributed, creating a rich chocolate aroma that fills the air. This will serve as the foundation of your Italian Chocolate Tart, ensuring a luscious flavor right from the start.
Step 2: Incorporate the Butter
Cut 120 g of cold butter into small cubes and add it to the dry mixture. Use a pastry cutter or your fingers to blend the mixture until it resembles coarse crumbs, with the butter evenly distributed throughout. This should take about 3-5 minutes, resulting in a flaky texture that promises a tender crust for your tart.
Step 3: Form the Dough
Add 1 egg and 1 egg yolk into the butter-flour mixture. Stir until a dough begins to form, ensuring all dry ingredients are incorporated. You should achieve a soft, pliable dough. If it feels too crumbly, add a teaspoon of cold water. Once combined, shape it into a disk, wrap it in plastic wrap, and refrigerate for at least 30 minutes to firm up.
Step 4: Prepare the Tart Shell
Preheat your oven to 180°C (350°F). On a lightly floured surface, roll out the chilled dough until it’s large enough to fit a 9-inch tart pan, aiming for about ¼ inch thickness. Carefully transfer the dough to the pan, pressing it down gently, and trim any excess with a sharp knife for a neat finish.
Step 5: Vent the Dough
Using a fork, prick the bottom of the tart shell several times to create vent holes. This crucial step prevents bubbling during baking, ensuring the crust remains flat and beautiful. Place the tart shell in the oven and bake for about 15 minutes, until slightly firm and lightly golden. Remove from the oven and cool on a wire rack.
Step 6: Heat the Milk
While the crust cools, place 400 ml of milk in a saucepan over medium heat. Heat it just below boiling, stirring occasionally to prevent scalding. You’ll know it’s ready when tiny bubbles start forming around the edges. This warm milk will meld beautifully with the egg yolks in your filling for the Italian Chocolate Tart.
Step 7: Combine Egg Mixture
In a separate bowl, whisk together 4 egg yolks, 80 g granulated sugar, and 40 g flour until smooth and creamy, achieving a luxurious consistency. It’s important to mix well to avoid lumps in your filling. The sweetness from the sugar and richness from the yolks will enhance the overall delight of your tart.
Step 8: Temper the Egg Mixture
Slowly and carefully, add the hot milk to the egg mixture while whisking vigorously. This gradual addition warms the eggs without cooking them, creating a smooth custard base. Once combined, pour the mixture back into the saucepan and return it to the heat, cooking over medium heat while stirring constantly until thickened (about 5-7 minutes).
Step 9: Add the Chocolate
Remove the thickened custard from the heat and immediately stir in 200 g of dark chocolate, chopped into small pieces. Keep stirring until the chocolate has completely melted and the mixture is silky smooth. This rich chocolate filling is what makes your Italian Chocolate Tart truly indulgent and irresistible.
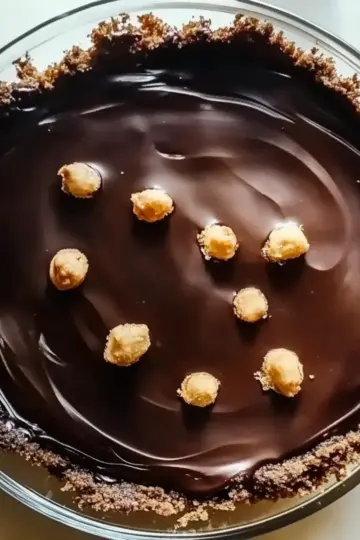
Step 10: Fill the Tart
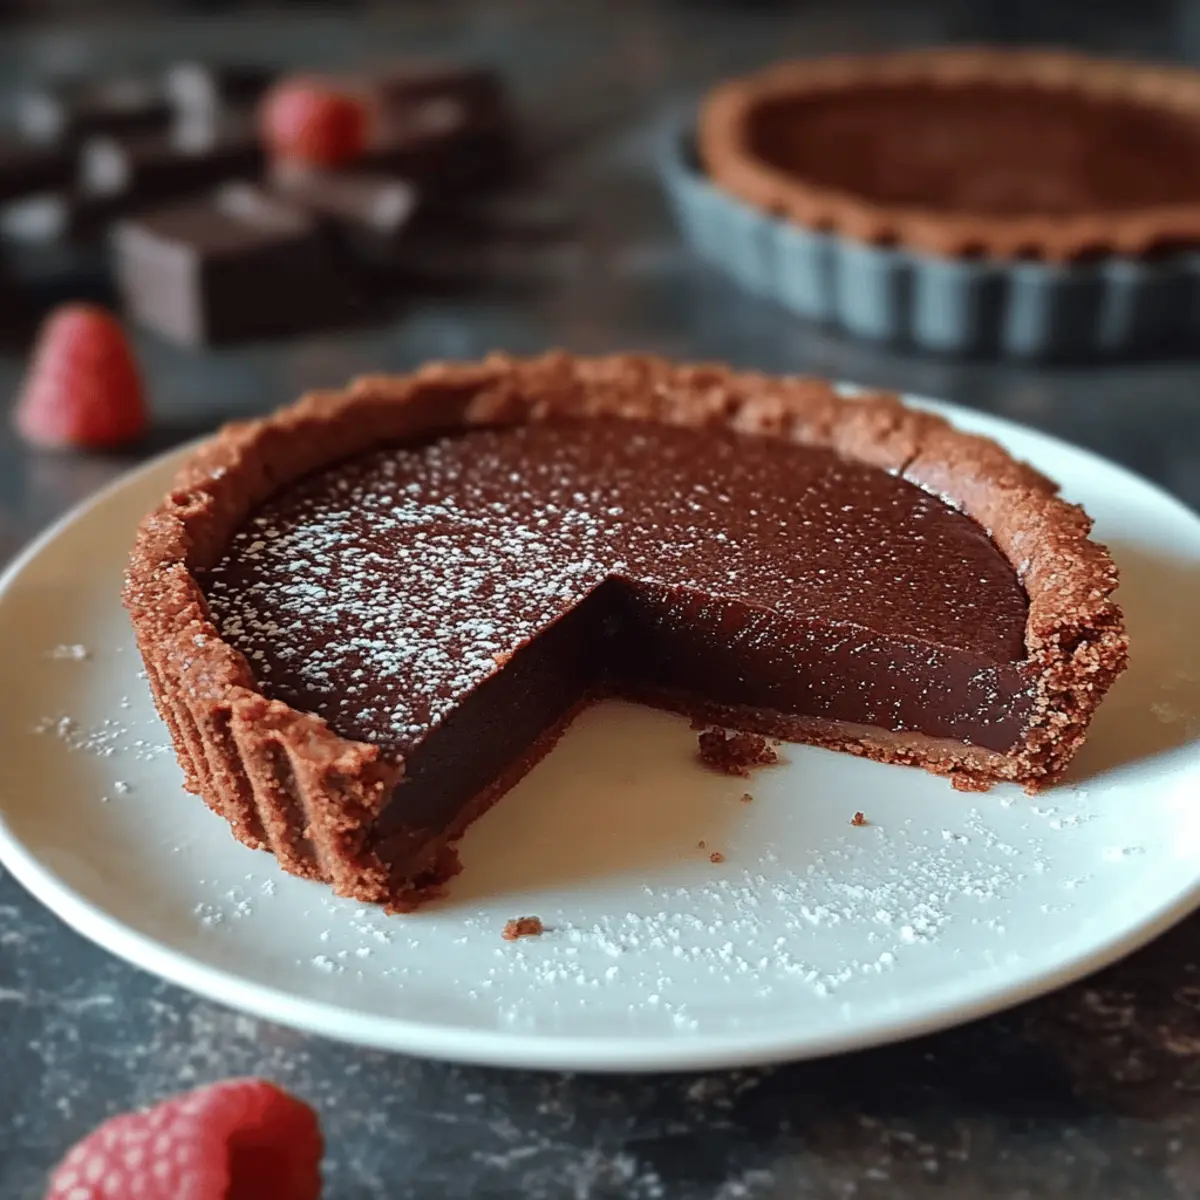
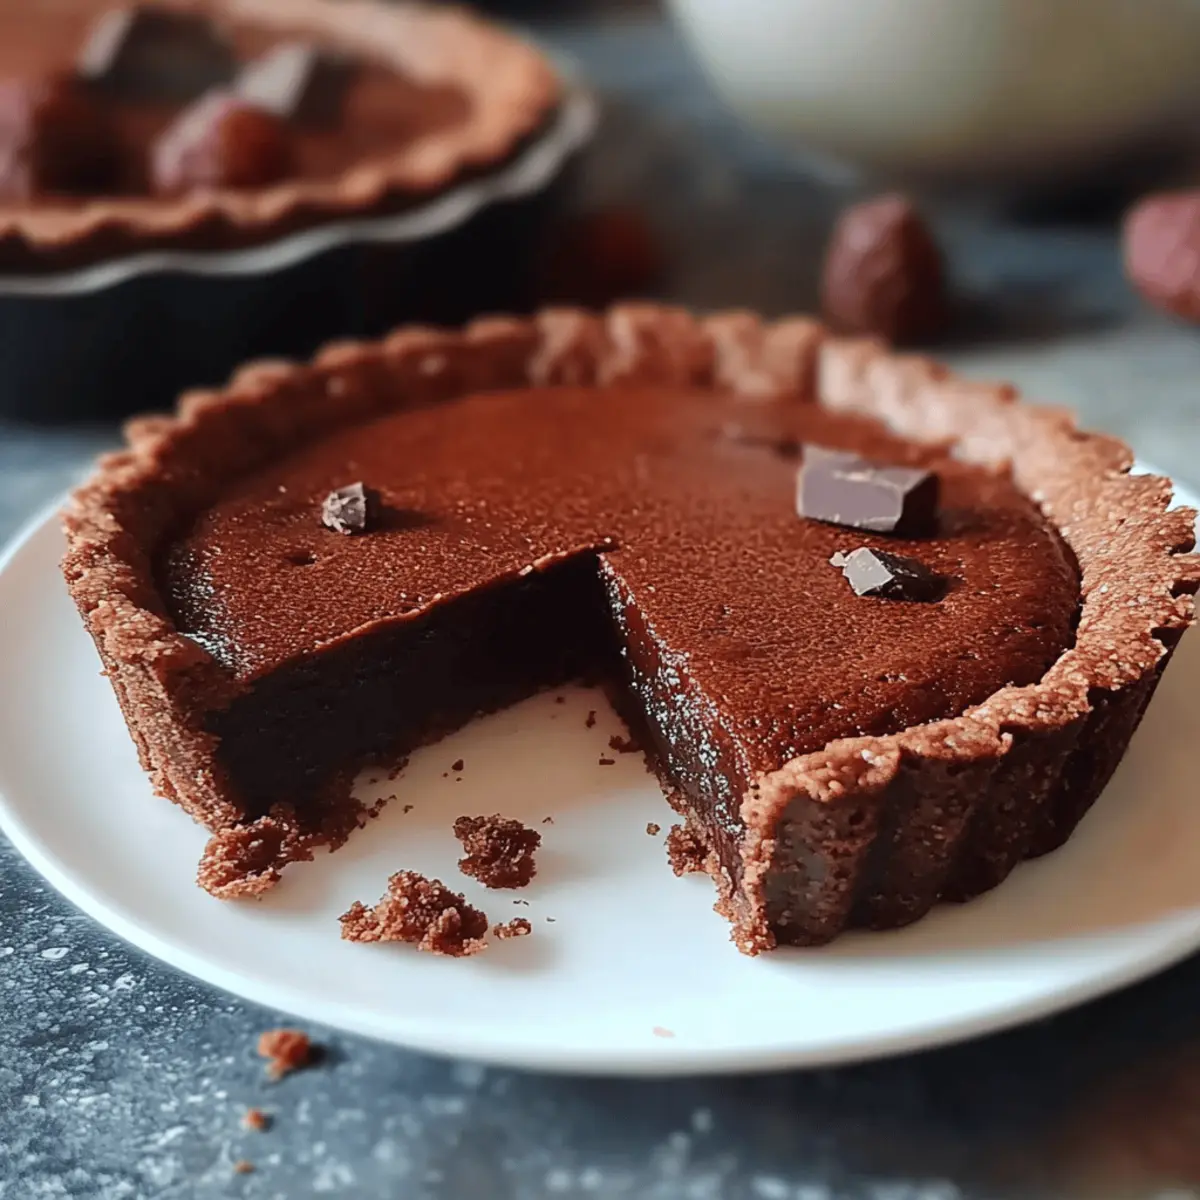
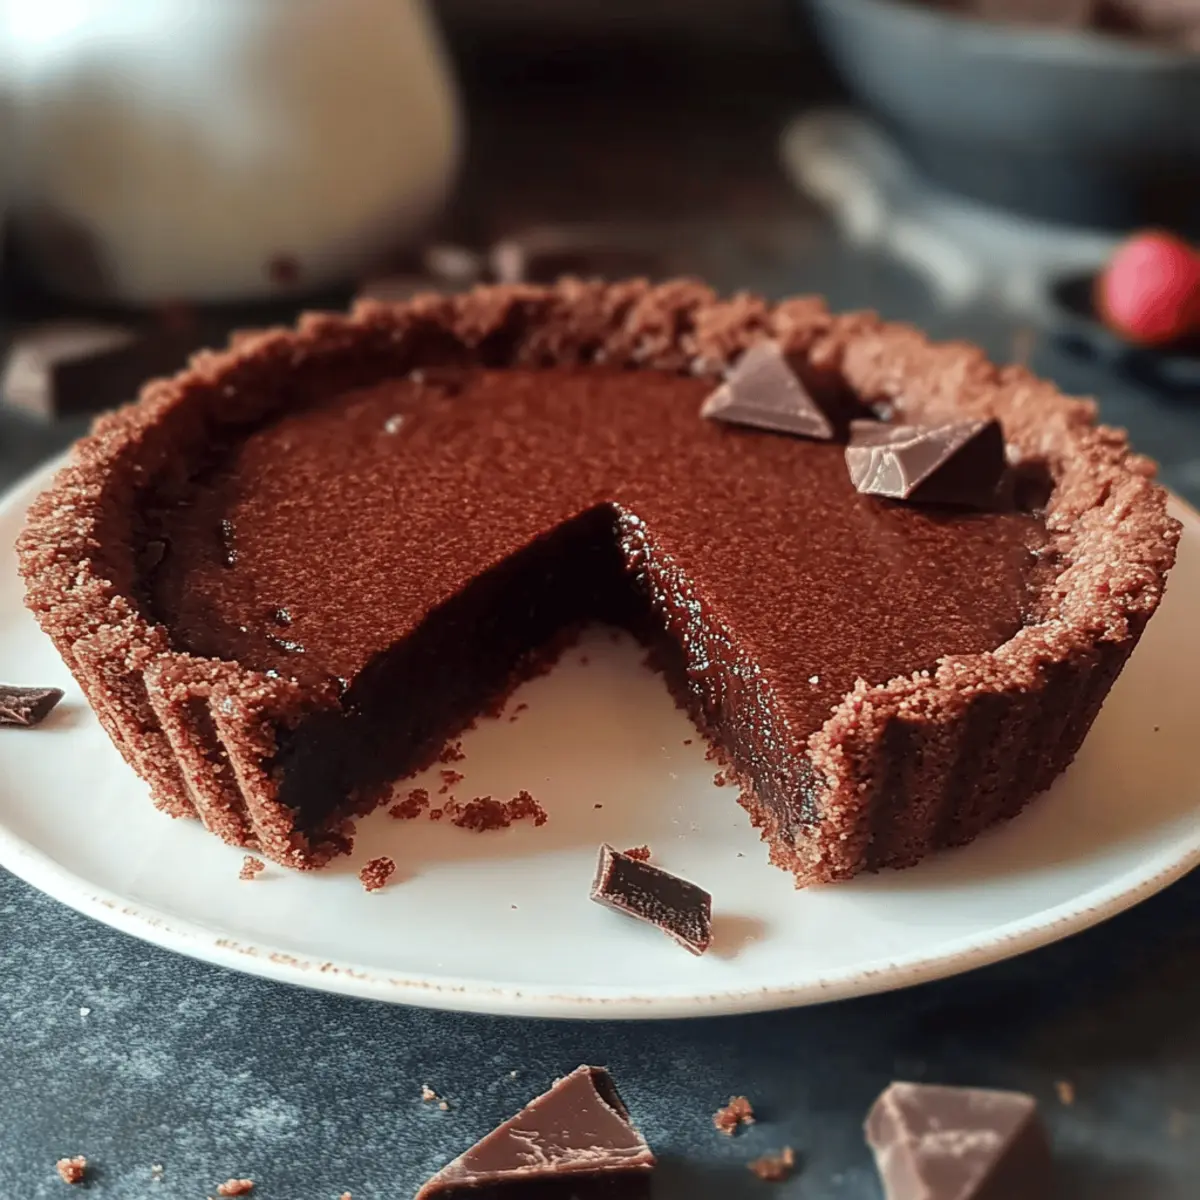
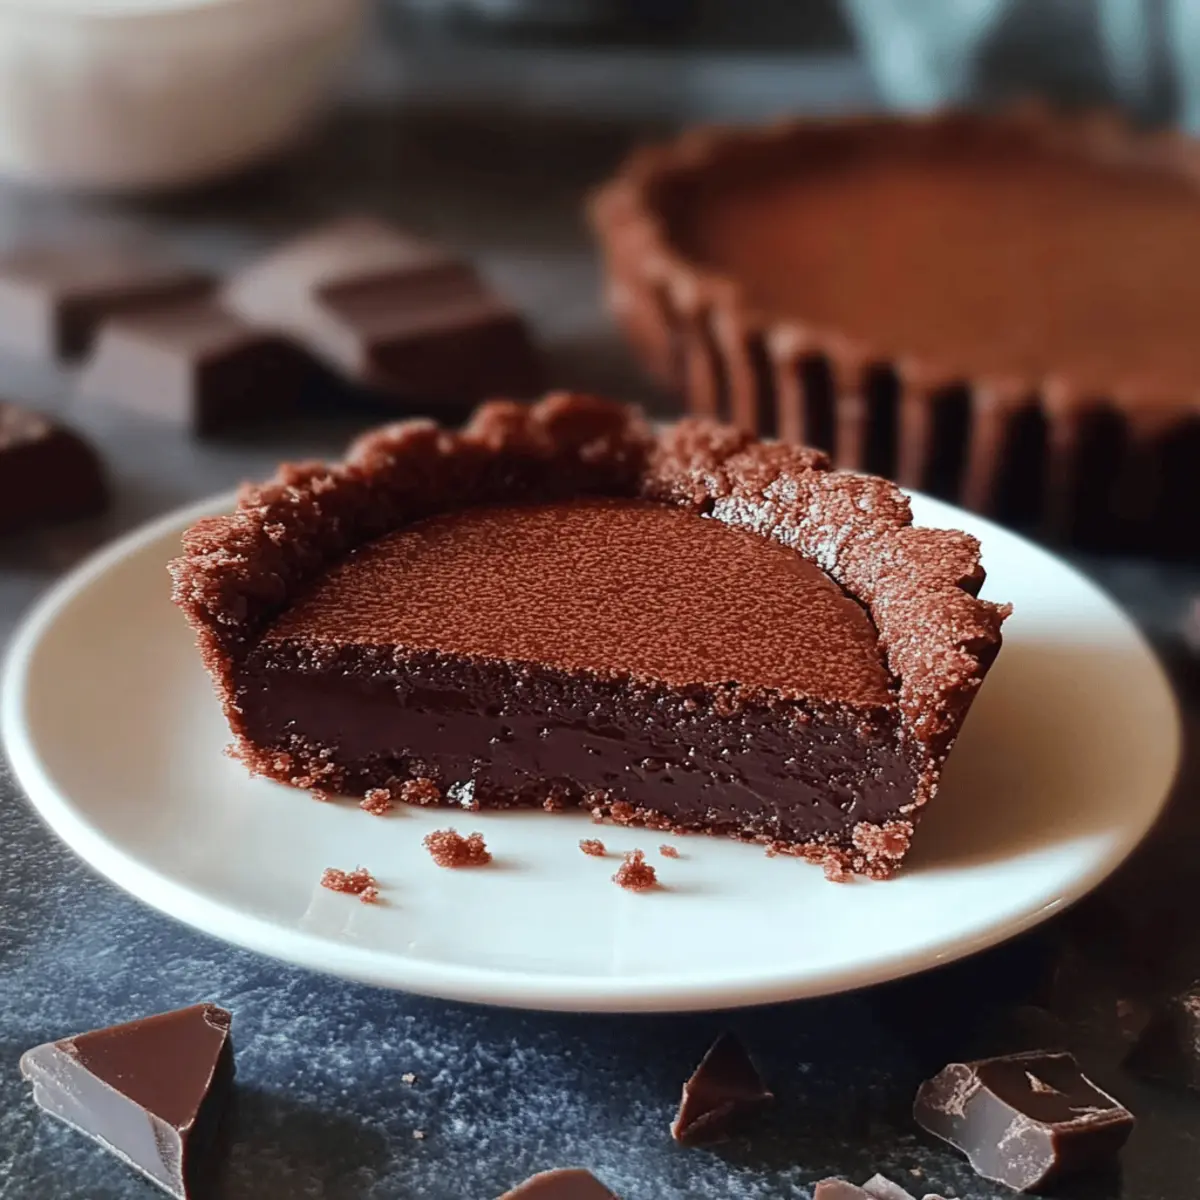
Pour the luscious chocolate filling into the cooled tart shell, smoothing it out evenly with a spatula. Make sure the filling is level, enhancing its visual appeal. The contrast between the dark chocolate and the flaky crust will be stunning, creating a dessert that looks as good as it tastes.
Step 11: Chill and Set
Place the filled tart in the refrigerator for at least 30 minutes, allowing it to set properly. This chilling step not only firms up the tart but also enhances the flavors, making the experience of your Italian Chocolate Tart even more delightful.
Step 12: Serve with Flair
Once chilled, slice the tart into generous wedges and serve it with optional garnishes like chocolate shavings, whipped cream, or fresh berries for added flavor and texture. Each slice will reveal the beautiful, rich filling that’s sure to impress your guests. Enjoy the delightful taste of homemade indulgence!
How to Store and Freeze Italian Chocolate Tart
Fridge: Store the Italian Chocolate Tart in an airtight container in the refrigerator for up to 3 days to maintain its freshness and flavor.
Freezer: To freeze, wrap the tart tightly in plastic wrap and aluminum foil, ensuring no air pockets remain. It can be frozen for up to 2 months for a delightful treat later.
Thawing: When ready to enjoy, thaw the tart in the refrigerator overnight. This gradual thaw will keep it deliciously smooth and maintain the texture of the filling.
Reheating: If you prefer it warm, you can gently reheat individual slices in the microwave for about 10-15 seconds, just until slightly warmed.
Italian Chocolate Tart Variations
Feel free to make this Italian Chocolate Tart your own with these fun twists and substitutions that enhance flavor and cater to your dietary needs.
-
Gluten-Free: Substitute with gluten-free flour blend for a delightful tart that everyone can enjoy.
-
Nutty Crust: Add finely ground nuts, like almonds or hazelnuts, to the crust for a richer flavor and extra crunch. The addition of nuts elevates the tart to gourmet status while providing a unique texture that contrasts beautifully with the smooth filling.
-
Dairy-Free: Use coconut milk and vegan butter to create a dairy-free version without sacrificing flavor. The coconut milk imparts a subtle tropical note that adds a delightful surprise to each bite.
-
Mint Infusion: Add a few drops of peppermint extract to the chocolate filling for a refreshing twist that will awaken your senses. This minty flair creates a delightful layer of complexity that makes each slice feel festive and bright.
-
Spicy Kick: Mix in a pinch of cayenne pepper or chili powder to the filling for a surprising heat that balances the sweetness beautifully. This unexpected kick will certainly turn heads and add an exciting element to the experience.
-
Fruit Surprise: Fold in fresh raspberries or orange zest into the chocolate filling for a burst of freshness that complements the rich chocolate. The fruit balances the tart’s richness with a delightful tartness, transforming each bite into a refreshing treat.
-
Double Chocolate: Use milk chocolate in place of dark chocolate for a sweeter, creamier filling that is sure to satisfy chocoholics. This variation creates a dessert that resonates with those who crave a sweeter touch, ensuring every slice is pure bliss.
-
Coffee Twist: Incorporate espresso powder into the filling for an intensified chocolate flavor—perfect for coffee lovers! This addition not only enhances the chocolate but also adds depth, making each bite an experience to savor.
What to Serve with Italian Chocolate Tart
Imagine a delightful evening with the rich aromas of chocolate filling the air, perfect for sharing with loved ones.
-
Whipped Cream: A dollop of lightly sweetened whipped cream adds a light, airy contrast to the dense chocolate tart, enhancing each slice’s richness.
-
Fresh Berries: Raspberries or strawberries not only bring a pop of color but their tartness balances the sweetness, creating a symphony of flavors in every bite.
-
Toasted Nuts: Chopped hazelnuts or almonds add a delightful crunch and nutty flavor that perfectly complements the tart’s smooth texture.
-
Vanilla Ice Cream: Creamy vanilla ice cream brings out the chocolate’s richness, making it a perfect pairing for a decadent dessert experience.
-
Espresso or Coffee: A cup of rich, bold espresso cuts through the sweetness, enhancing the tart's chocolate depth and offering a classic Italian coffee experience.
-
Mint Leaves: For a refreshing twist, garnish with fresh mint leaves; their bright flavor lifts the chocolate’s richness and adds an inviting presentation touch.
-
Chocolate Sauce: Drizzling a bit of chocolate sauce on the plate can intensify the experience, showcasing the tart’s elegance and your culinary flair.
Make Ahead Options
These Italian Chocolate Tart preparations are perfect for busy home cooks looking to save time! You can make the tart crust up to 24 hours in advance. Simply prepare the dough, wrap it tightly in plastic wrap, and refrigerate it until you’re ready to bake. Additionally, the chocolate filling can be made and stored in the fridge for up to 3 days in an airtight container to keep it fresh. When you're ready to serve, bake the crust, fill it with the prepared chocolate mixture, and chill the tart for at least 30 minutes. This way, you can enjoy a delectable dessert that’s just as delicious and ready to impress your guests!
Expert Tips for Italian Chocolate Tart
Quality Ingredients: Use high-quality dark chocolate for a rich and indulgent flavor that elevates your Italian Chocolate Tart to gourmet status.
Proper Chilling: Don’t skip the chilling time! This step helps the tart set properly, ensuring the filling is smooth and creamy, enhancing your dessert experience.
Avoiding Overcooking: Keep a close eye on the custard while heating; overcooking can lead to scrambled eggs instead of a luscious chocolate filling.
Crust Perfection: For a flaky crust, make sure the butter is cold and handle the dough as little as possible. Less warmth means a better texture!
Creative Garnishes: Get creative with toppings! Fresh berries, whipped cream, or chopped nuts add texture and complement the rich chocolate beautifully.
Italian Chocolate Tart Recipe FAQs
What type of chocolate should I use for the filling?
Absolutely! I recommend using high-quality dark chocolate with at least 70% cocoa content. This will provide a rich and deep chocolate flavor that complements the tart beautifully. Avoid using overly sweet chocolate, as it can overpower the dessert's balance.
How do I know when my crust is perfectly baked?
Look for a slight golden color around the edges and a firm texture when you gently press down. The crust should not look wet or doughy. Pricking with a fork and watching for bubbling will help ensure it cooks evenly. It typically takes about 15 minutes at 180°C (350°F).
How long can I store leftovers?
Your Italian Chocolate Tart can be stored in an airtight container in the refrigerator for up to 3 days. Just make sure it's well-sealed to prevent any flavors from transferring and keep that deliciousness intact!
Can I freeze the Italian Chocolate Tart?
Absolutely! To freeze, wrap the tart tightly in plastic wrap and then in aluminum foil to prevent freezer burn. It can be stored for up to 2 months. When you're ready to enjoy it, simply thaw it overnight in the refrigerator for optimal texture.
What if my filling isn't thickening?
If your filling isn't thickening after cooking for about 5-7 minutes, it might be due to undercooked egg yolks. Make sure you're cooking over medium heat while stirring continuously. If you notice it's still runny, you can add a bit more flour mixed with milk to help it thicken, cooking for a few additional minutes.
Is this recipe safe for those with allergies?
Great question! This tart contains gluten, dairy, and eggs, so it’s not suitable for those with related allergies. For a gluten-free alternative, you can try substituting the flour with a gluten-free blend and ensuring that all your other ingredients are gluten-free as well.
Indulgent Italian Chocolate Tart That Will Wow Your Guests
Ingredients
Equipment
Method
- In a mixing bowl, combine flour, granulated sugar, cocoa powder, and salt. Blend until evenly distributed.
- Cut cold butter into small cubes and add to the mixture. Blend until it resembles coarse crumbs.
- Add egg and egg yolk, stirring until a dough forms. Wrap in plastic and refrigerate for at least 30 minutes.
- Preheat oven to 180°C (350°F). Roll out the dough and transfer it to a tart pan, trimming excess.
- Prick the bottom of the tart shell with a fork. Bake for about 15 minutes, then cool on a wire rack.
- Heat milk in a saucepan over medium heat until small bubbles form around edges.
- In a bowl, whisk together egg yolks, granulated sugar, and flour until smooth.
- Gradually add hot milk, whisking constantly to temper the eggs, then return to the pan.
- Cook over medium heat, stirring constantly, until thickened.
- Stir in chopped dark chocolate until melted and smooth.
- Pour the chocolate filling into the cooled tart shell and smooth the top.
- Chill in the refrigerator for at least 30 minutes before serving.
- Slice the tart into wedges and serve with optional garnishes like whipped cream or fresh berries.

Leave a Reply