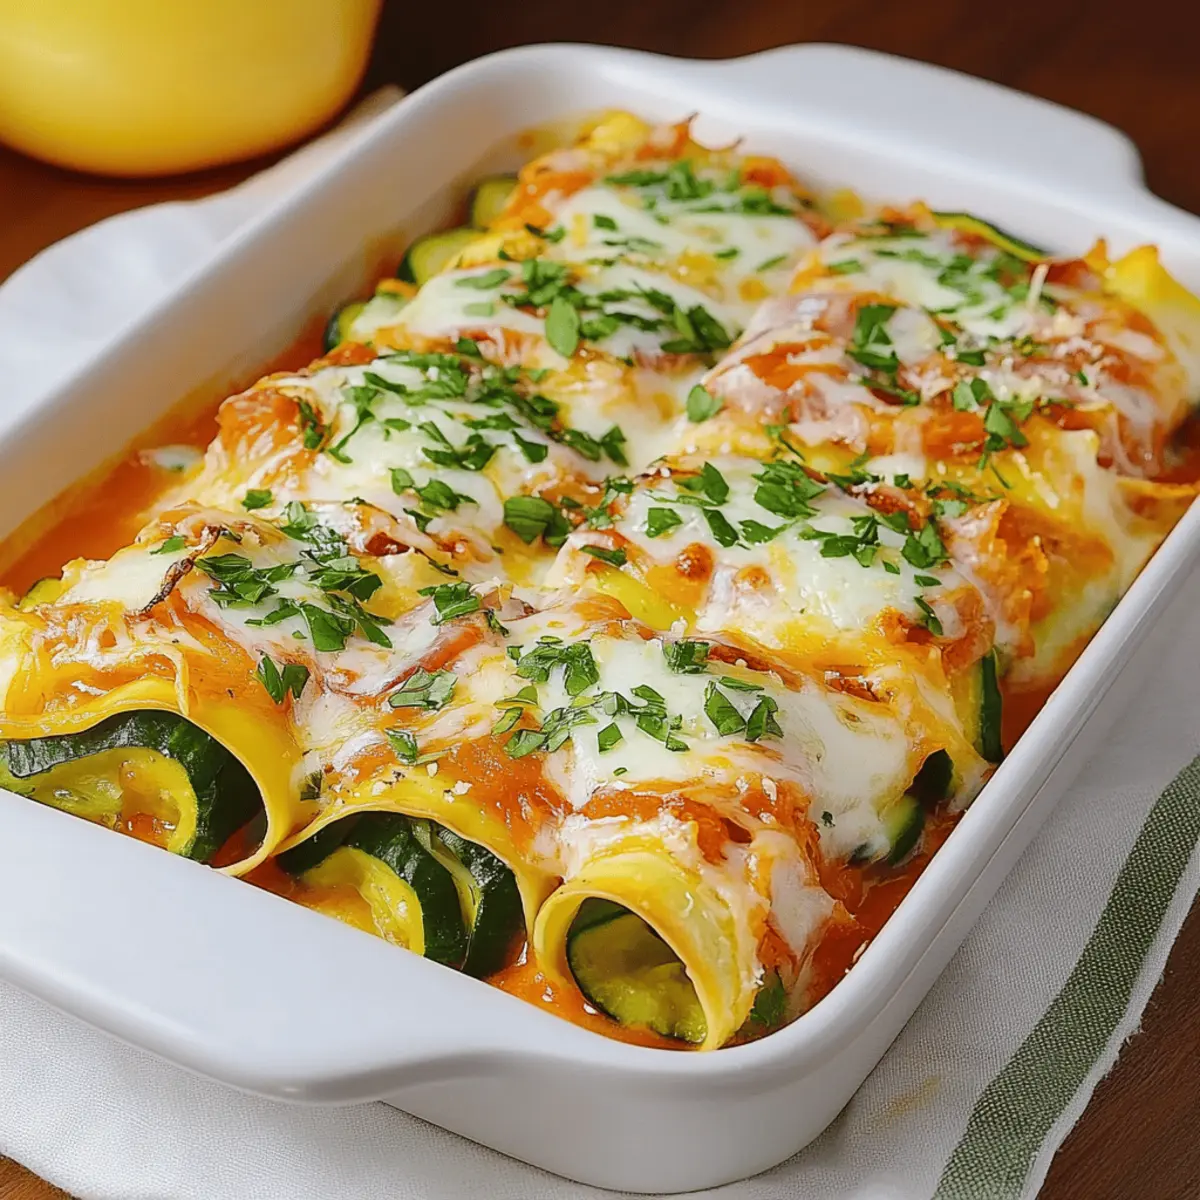
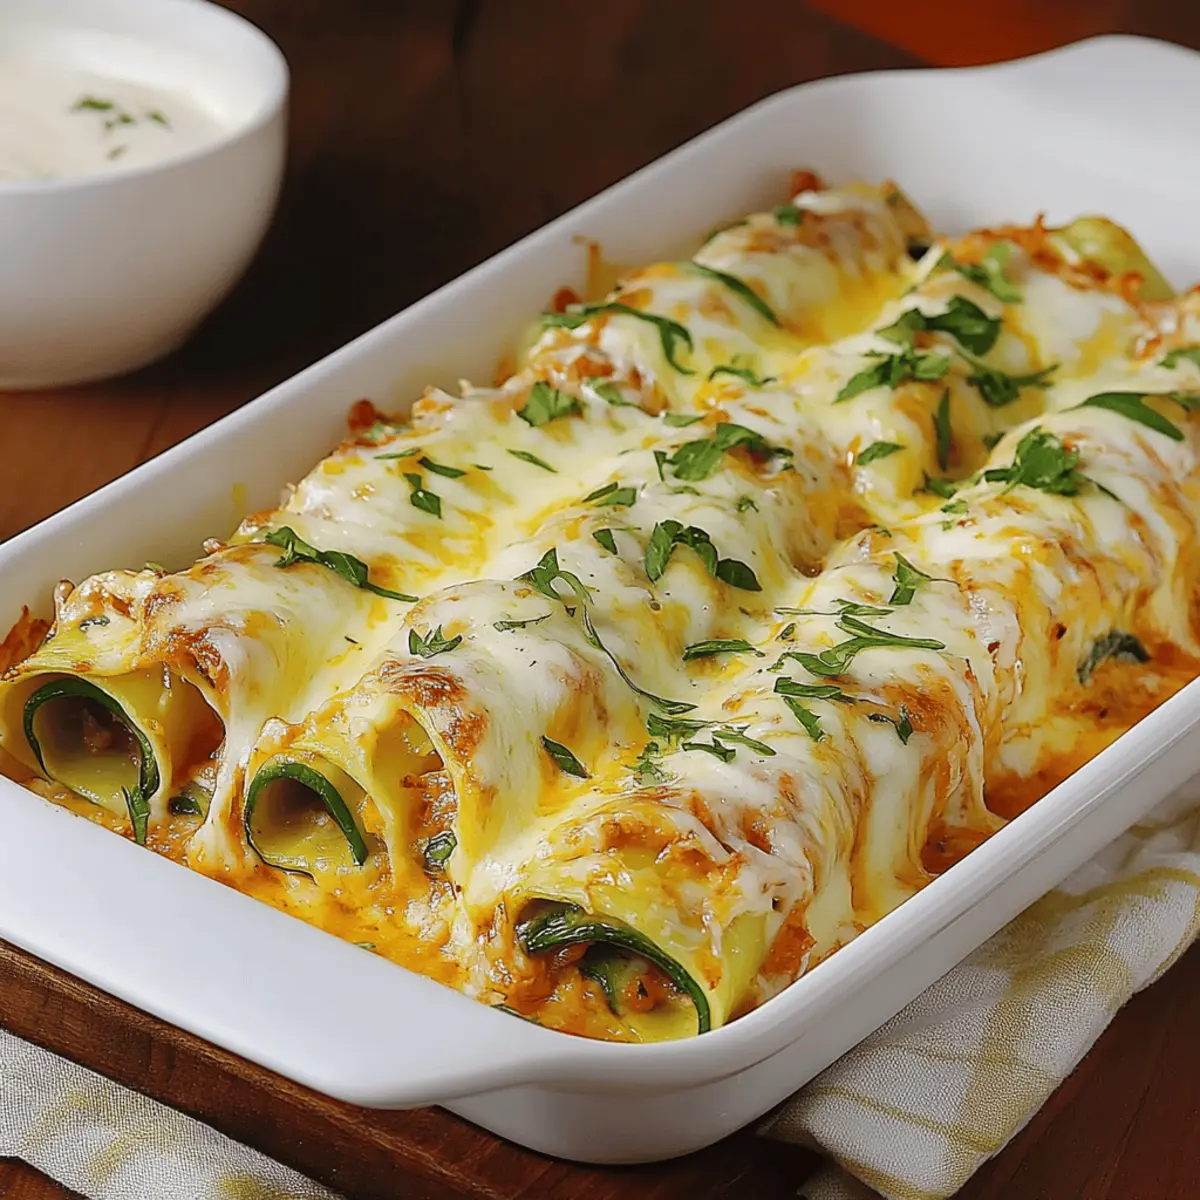
As I sliced through the vibrant green zucchinis, a wave of nostalgia washed over me, reminding me of the warm, cozy meals shared around the family table. Today, I’m excited to introduce you to my Zucchini Enchiladas, a delicious twist on a classic dish that swaps out traditional tortillas for a nutritious veggie alternative. Not only are these enchiladas a healthier option, but they also come together in just under an hour—perfect for a weeknight dinner that won’t keep you in the kitchen for too long. With hearty black beans, sweet corn, and a generous layer of gooey cheese, this recipe promises to be a crowd-pleaser for both friends and family alike. Curious about how to make these scrumptious rolls of flavor? Let’s dive into the details!
Why are Zucchini Enchiladas a Game-Changer?
Versatile: These enchiladas are an excellent way to incorporate veggies into your meals without sacrificing flavor. You can easily substitute ingredients based on your pantry!
Quick to Prepare: In just 50 minutes, you’ll have a hearty, flavorful dish ready to enjoy, making it perfect for busy weeknights.
Crowd-Pleasing: With a melty cheese topping and rich filling, they’re sure to impress everyone at the dinner table—plant-based or not!
Healthy Alternative: Swapping out tortillas for zucchini cleverly cuts carbs while adding fiber and nutrients to your meal.
Flavor Packed: Each bite offers a delightful burst of spices and textures, showcasing a perfect balance of savory and fresh ingredients.
Zucchini Enchiladas Ingredients
For the Filling
• Black beans – packed with protein and makes a hearty base for the filling.
• Corn – adds a touch of sweetness that complements the savory spices perfectly.
• Cumin – enhances the overall flavor, giving the dish a warm, earthy aroma.
• Chili powder – provides a gentle kick that makes every bite exciting.
• Garlic powder – infuses the filling with a savory depth that elevates the taste.
• Salt – essential for bringing out the flavors and balancing the dish.
• Pepper – adds a subtle heat for extra flavor punch.
• Shredded cheese – the gooey topping that binds everything together; use your favorite variety!
For the Zucchini
• Zucchini – serves as a delightful and nutritious replacement for traditional tortillas, keeping the dish light.
For the Assembly
• Enchilada sauce – adds moisture and richness, ensuring the enchiladas are bursting with flavor.
• Fresh cilantro – a vibrant garnish that brightens each plate and adds freshness.
Embark on this culinary journey with these tasty Zucchini Enchiladas, and prepare to impress!
Step‑by‑Step Instructions for Zucchini Enchiladas
Step 1: Preheat the Oven
Begin by preheating your oven to 375°F (190°C). This ensures that your Zucchini Enchiladas will bake evenly and come out perfectly cooked. Take a moment to gather your ingredients, including the enchilada sauce and shredded cheese, so everything is ready to go when the time comes.
Step 2: Prepare the Filling
In a large mixing bowl, combine the drained black beans, corn, cumin, chili powder, garlic powder, salt, and pepper. Mix thoroughly until the ingredients are evenly distributed. Add in half of the shredded cheese and continue mixing until everything is fully combined. You’ll want a vibrant, flavorful filling for your enchiladas.
Step 3: Slice the Zucchini
Next, slice your zucchinis lengthwise into thin strips, about ¼ inch thick, to create zucchini “tortillas.” Aim for even strips, as they will hold the filling and roll up easily. Use a sharp knife for clean cuts, and set aside the zucchini strips on a baking sheet or plate while you prepare the assembly.
Step 4: Assemble the Enchiladas
Now it’s time to assemble your Zucchini Enchiladas! Take a zucchini strip, place a generous spoonful of the filling at one end, and gently roll it up. Secure it by placing it seam-side down in a greased baking dish. Repeat this process until all filling and zucchini strips are used, creating a mouthwatering display in your dish.
Step 5: Add Sauce and Cheese
Once your rolled enchiladas are arranged snugly in the baking dish, pour the enchilada sauce over the top, allowing it to generously cover each roll. Sprinkle the remaining shredded cheese evenly over the sauce, ensuring an irresistible melty topping. This step is key for enhancing the flavor of your Zucchini Enchiladas!
Step 6: Bake the Enchiladas
Place the baking dish in your preheated oven and bake for 30 minutes. Look for the cheese to become bubbly and golden, indicating that your enchiladas are fully cooked. The aroma filling your kitchen will be a sure sign that something delicious is on the way!
Step 7: Garnish and Serve
Carefully remove the baking dish from the oven and let the enchiladas cool for a few moments. Garnish with freshly chopped cilantro for a pop of color and added flavor. Serve your Zucchini Enchiladas hot, and watch your family and friends delight in this comforting, nutritious dish!

Storage Tips for Zucchini Enchiladas
Fridge: Store leftover Zucchini Enchiladas in an airtight container for up to 3 days. Make sure to place a layer of plastic wrap over the dish before sealing to maintain moisture.
Freezer: To freeze, wrap each enchilada tightly in foil or plastic wrap and place them in a freezer-safe bag. They can last up to 3 months!
Reheating: When ready to enjoy, thaw overnight in the fridge. Reheat in the oven at 350°F (175°C) for about 20 minutes or until heated through.
Avoid Soggy Enchiladas: If you plan to store and reheat, consider waiting to add any garnishes, such as cilantro, until after reheating to keep flavors fresh.
What to Serve with Zucchini Enchiladas?
Elevate your meal with these delightful pairings that balance flavors, textures, and freshness to create a complete dining experience.
- Crispy Guacamole: Creamy and tangy, this luscious dip complements the spiciness of enchiladas and adds a refreshing touch.
- Fresh Garden Salad: A mix of greens, tomatoes, and cucumbers dressed lightly brings brightness and crunch, enhancing the richness of the enchiladas.
- Cilantro Lime Rice: The zesty flavors of this side dish tie in beautifully with the Mexican theme while providing a gratifying texture contrast.
- Grilled Corn on the Cob: Sweet and charred, this summer favorite pairs perfectly with the savory enchiladas, adding a rustic touch to your meal.
- Roasted Veggies: Caramelized bell peppers, onions, and zucchini heighten the healthy aspect, bringing added flavor and nutrition to the table.
- Chipotle Black Bean Soup: This warming, smoky soup enriches the meal, echoing the flavors in your enchiladas while adding a comforting element.
- Frozen Margarita: A refreshing cocktail with a hint of lime makes for a fun and festive beverage pairing, perfect for a summer evening feast.
- Churros for Dessert: Indulge your sweet tooth with these crispy, cinnamon-sugar treats that provide a delightful contrast to the savory main dish.
Make Ahead Options
These Zucchini Enchiladas are a fantastic choice for meal prep, saving you time on busy weeknights! You can assemble the enchiladas and cover them tightly, storing them in the refrigerator for up to 24 hours. Just be sure to pour the enchilada sauce and sprinkle the cheese on top right before baking to maintain that gooey meltiness. To finish, preheat your oven and bake as directed for 30 minutes until bubbly and golden. This way, you'll have a delicious, wholesome meal ready to enjoy without the last-minute hassle—just as flavorful and comforting as if you made them fresh!
Expert Tips for Zucchini Enchiladas
Slice Evenly: Aim for uniform zucchini strips to ensure even cooking and rolling. Uneven slices may lead to breakage during assembly.
Don’t Overfill: Be mindful of how much filling you place in each zucchini strip. Overfilling can cause them to burst during baking, creating a mess.
Sauce Generously: Pour enough enchilada sauce over the rolled enchiladas to keep them moist while they bake. This also helps the cheese to melt beautifully.
Experiment with Spices: Feel free to adjust the spices in the filling according to your preference. A pinch of smoked paprika can add a delightful twist to your Zucchini Enchiladas.
Perfectly Melty Cheese: For the best gooey topping, use a mix of cheeses like Monterey Jack and cheddar. This enhances flavor and creates an irresistible crust.
Zucchini Enchiladas Variations
Feel free to explore your creativity and personalize your Zucchini Enchiladas with these delightful twists!
- Dairy-Free: Substitute shredded cheese with dairy-free cheese or omit it entirely for a lighter, plant-based version.
- Spicy Kick: Add diced jalapeños or a few dashes of hot sauce to the filling for a fiery flavor boost. You can really turn up the heat to satisfy those spicy cravings!
- Quinoa Addition: Mix in cooked quinoa with the filling to boost protein and add a delightful texture. This hearty combination will keep everyone feeling satisfied.
- Veggie Medley: Add your favorite chopped veggies, like bell peppers or spinach, to the filling for extra nutrients and color. Your enchiladas will become even more vibrant and delicious!
- Seasonal Twist: Use summer squash or eggplant slices in place of zucchini for a fun seasonal twist. Each veggie brings its unique flavor to the table!
- Gluten-Free: Ensure your enchilada sauce is gluten-free, or make your own to avoid any gluten concerns while enjoying these delicious rolls!
- Cheese Lover's Delight: Experiment with different cheeses like feta, goat cheese, or pepper jack for unexpected flavor profiles that will wow your taste buds.
- Herb Infusion: Consider mixing fresh herbs like basil or oregano into the filling to give it an aromatic freshness that elevates each bite.

Zucchini Enchiladas Recipe FAQs
What type of zucchini should I use for this recipe?
Absolutely! Look for firm, medium-sized zucchinis with smooth skin. Avoid any that have dark spots all over, as this may indicate overripeness or decay. Fresh zucchinis will enhance the flavor and texture of your enchiladas!
How should I store leftover Zucchini Enchiladas?
Store your leftover Zucchini Enchiladas in an airtight container in the fridge for up to 3 days. To maintain moisture, cover the dish with plastic wrap before sealing. When it’s time to eat, just pop them in the oven to warm up!
Can I freeze Zucchini Enchiladas?
Yes, you can! To freeze, wrap each assembled enchilada tightly in aluminum foil or plastic wrap, then place them in a freezer-safe bag. They can stay delicious in your freezer for up to 3 months. When you’re ready to enjoy them, thaw overnight in the refrigerator before reheating in the oven.
What if my enchiladas are watery after baking?
If your Zucchini Enchiladas turn out watery, it may be because the zucchinis released too much moisture during baking. To prevent this, pat the zucchini strips dry with a paper towel before filling them. Additionally, consider using a thicker enchilada sauce to help absorb excess moisture.
Are Zucchini Enchiladas suitable for gluten-free diets?
Very much so! This recipe is naturally gluten-free since we're using zucchini instead of traditional tortillas. However, be sure to check the labels of your enchilada sauce and any additional ingredients you use to ensure they're also gluten-free.
Can I add protein to the filling?
The more the merrier! Feel free to add cooked shredded chicken, ground turkey, or even tofu to the filling mix. Just be mindful to keep the ratios balanced so that the enchiladas maintain their structure and bake evenly.
Irresistible Zucchini Enchiladas You'll Love to Make
Ingredients
Equipment
Method
- Preheat your oven to 375°F (190°C).
- In a large mixing bowl, combine the drained black beans, corn, cumin, chili powder, garlic powder, salt, and pepper. Mix thoroughly until evenly distributed. Add in half of the shredded cheese and mix until fully combined.
- Slice the zucchinis lengthwise into thin strips, about ¼ inch thick. Set aside the zucchini strips.
- Take a zucchini strip, place a generous spoonful of the filling at one end, and roll it up. Secure it seam-side down in a greased baking dish. Repeat until all filling and zucchini strips are used.
- Pour the enchilada sauce over the rolled enchiladas and sprinkle the remaining shredded cheese over the sauce.
- Bake for 30 minutes or until the cheese is bubbly and golden.
- Garnish with freshly chopped cilantro before serving.


Leave a Reply